> ## Documentation Index
> Fetch the complete documentation index at: https://mw-docs.middleware.io/llms.txt
> Use this file to discover all available pages before exploring further.
# Amazon ECS
> Amazon ECS Infra Agent - Setup & Installation Docs | Middleware
Amazon Elastic Container Service (Amazon ECS) is a fully managed container orchestration service that helps you easily deploy, manage, and scale containerized applications.
With the Infrastructure Agent (Infra Agent), you can effectively monitor your ECS containers and tasks running on ECS EC2 instances and ECS Fargate in your cloud, on-prem, and hybrid architectures.
Database Integrations and the Amazon ECS Anywhere approach are not currently supported.
# Fargate Setup
Use the Middleware and AWS Fargate integration to monitor your applications without having to manage servers.
### Create a Sidecar
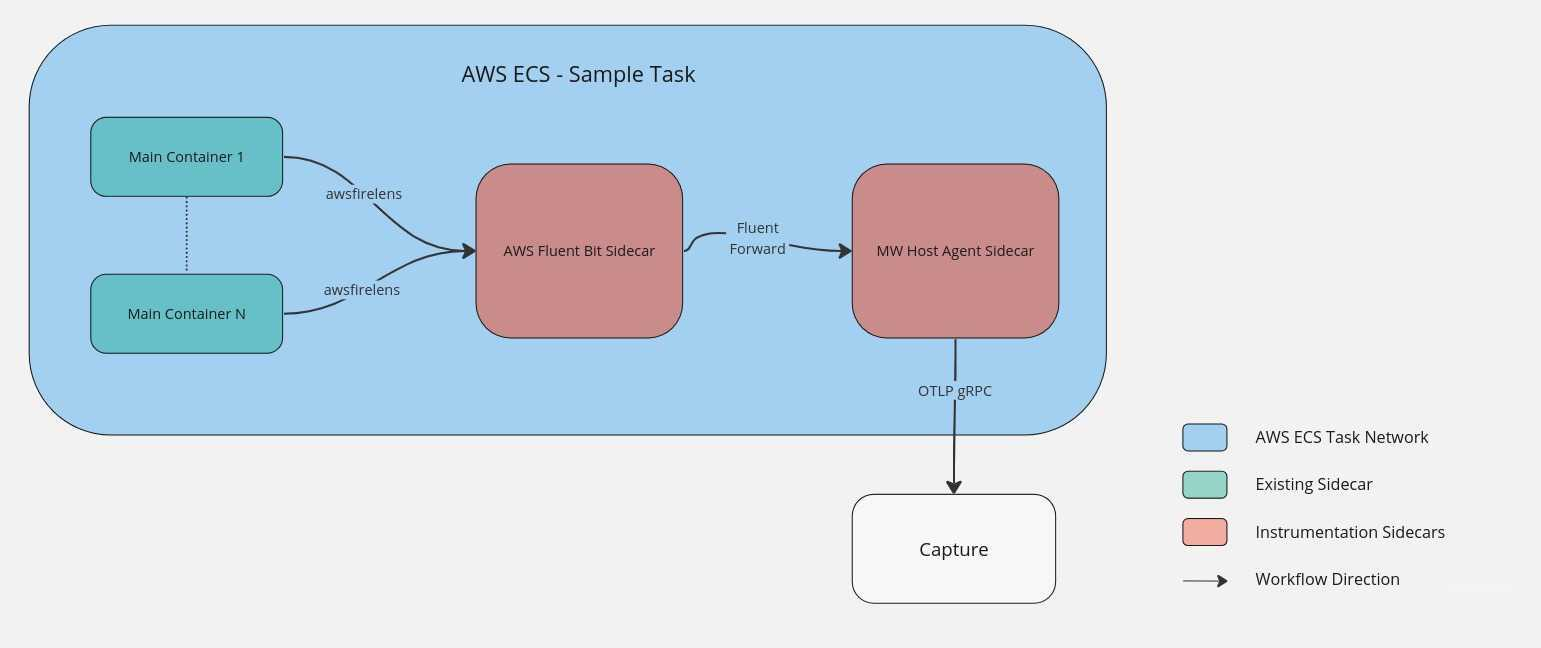
For Each ECS Task that you want to monitor, add the following sidecar container in your task definition.
```json JSON theme={null}
{
"name": "mw-agent",
"image": "ghcr.io/middleware-labs/mw-host-agent:master",
"cpu": 256,
"portMappings": [
{
"name": "8006-tcp",
"containerPort": 8006,
"hostPort": 8006,
"protocol": "tcp",
"appProtocol": "http"
}
],
"essential": true,
"environment": [
{
"name": "MW_API_KEY",
"value": ""
},
{
"name": "MW_TARGET",
"value": ""
},
],
"mountPoints": [],
"volumesFrom": [],
"logConfiguration": {
}
}
```
### Collect Metrics
Adding the sidecar container mentioned above will automatically collect metrics data from your ECS tasks and containers. The Infra Agent uses the AWS ECS Task Metadata Endpoint to fetch metrics data.
### Collect Logs
Forward your ECS Task logs to Middleware. The `mw-agent` sidecar, mentioned [above](/integrations/aws-ecs-monitoring#create-a-sidecar), must be running before proceeeding.
```json JSON theme={null}
{
"name": "log_router",
"image": "amazon/aws-for-fluent-bit:stable",
"cpu": 0,
"portMappings": [],
"essential": true,
"environment": [],
"mountPoints": [],
"volumesFrom": [],
"user": "0",
"firelensConfiguration": {
"type": "fluentbit",
"options": {
"enable-ecs-log-metadata": "true"
}
}
}
```
The Infra Agent sidecar will fetch these logs and send them to Middleware.
```json JSON theme={null}
"logConfiguration": {
"logDriver": "awsfirelens",
"options": {
"Host": "127.0.0.1",
"Name": "forward",
"Port": "8006"
}
}
```
Firelens by default sends a JSON blob which Middleware displays as the log body. Parsing the JSON logs allows the `Message` of the log being displayed while the attributes will be viewable on expansion.
To change the behavior you will need to add the below options to the `firelensConfiguration` created in Step 1.
the JSON structured logs generated need to have a `Message` field. Otherwise Middleware will not know what should be shown as a body of the log.
```json JSON theme={null}
"firelensConfiguration": {
"type": "fluentbit",
"options": {
"config-file-type": "file",
"config-file-value": "/fluent-bit/configs/parse-json.conf",
"enable-ecs-log-metadata": "true"
}
}
```
# EC2 Setup
Begin by creating a Task Definition for the Infra Agent container.
```json JSON theme={null}
{
"family": "mw-agent-task",
"containerDefinitions": [
{
"name": "mw-agent",
"image": "ghcr.io/middleware-labs/mw-host-agent:master",
"cpu": 100,
"memory": 512,
"portMappings": [
{
"name": "mw-agent-9319-tcp",
"containerPort": 9319,
"hostPort": 9319,
"protocol": "tcp",
"appProtocol": "grpc"
},
{
"name": "mw-agent-8006-tcp",
"containerPort": 8006,
"hostPort": 8006,
"protocol": "tcp"
},
{
"name": "mw-agent-9320-tcp",
"containerPort": 9320,
"hostPort": 9320,
"protocol": "tcp"
}
],
"essential": true,
"environment": [
{
"name": "MW_API_KEY",
"value": ""
},
{
"name": "MW_TARGET",
"value": ""
}
],
"mountPoints": [
{
"sourceVolume": "docker-sock",
"containerPath": "/var/run/docker.sock",
"readOnly": false
},
{
"sourceVolume": "proc",
"containerPath": "/rootfs/proc",
"readOnly": true
},
{
"sourceVolume": "dev",
"containerPath": "/rootfs/dev",
"readOnly": true
},
{
"sourceVolume": "al2_cgroup",
"containerPath": "/sys/fs/cgroup",
"readOnly": true
},
{
"sourceVolume": "al1_cgroup",
"containerPath": "/cgroup",
"readOnly": true
},
{
"sourceVolume": "al2_cgroup",
"containerPath": "/rootfs/sys/fs/cgroup",
"readOnly": true
},
{
"sourceVolume": "al1_cgroup",
"containerPath": "/rootfs/cgroup",
"readOnly": true
},
{
"sourceVolume": "docker-containers-root",
"containerPath": "/var/lib/docker/containers",
"readOnly": true
},
{
"sourceVolume": "var-log-host",
"containerPath": "/var/log",
"readOnly": true
}
],
"volumesFrom": [],
"privileged": true,
"systemControls": []
}
],
"networkMode": "host",
"volumes": [
{
"name": "docker-sock",
"host": {
"sourcePath": "/var/run/docker.sock"
}
},
{
"name": "proc",
"host": {
"sourcePath": "/proc"
}
},
{
"name": "dev",
"host": {
"sourcePath": "/dev"
}
},
{
"name": "al1_cgroup",
"host": {
"sourcePath": "/cgroup"
}
},
{
"name": "al2_cgroup",
"host": {
"sourcePath": "/sys/fs/cgroup"
}
},
{
"name": "docker-containers-root",
"host": {
"sourcePath": "/var/lib/docker/containers"
}
},
{
"name": "var-log-host",
"host": {
"sourcePath": "/var/log"
}
}
],
"requiresCompatibilities": [
"EC2"
],
"pidMode": "host"
}
```
You can register your Task Definition File using the the AWS CLI or the Amazon Web Console.
Execute the following command to register your Task Definition File in AWS. Learn more about the Amazon ECS CLI [here](https://docs.aws.amazon.com/cli/latest/reference/ecs/).
```cli CLI theme={null}
aws ecs register-task-definition --cli-input-json file://
```
Complete the following steps in the AWS Management Console to register your Task Definition File.
1. Log in to your AWS Management Console and navigate to the Elastic Container Service (ECS) section
2. In the left-hand menu, click on Task Definitions
3. Create a new Task Definition under the JSON tab
4. Copy and paste the configuration from your Task Definition file
5. Save your Task Definition JSON file
6. Click Create to register the Task Definition in AWS
Set up the Infra Agent Task Definition as a Daemon Service to ensure only one Infra Agent container is running on each EC2 instance of the ECS cluster
1. Log in to your AWS Management Console and navigate to the Elastic Container Service (ECS) section
2. Choose the ECS cluster you will run the Infra Agent on
3. Create a new service within the selected cluster
4. Setup the Environment section
a. Select Launch type under compute options
b. Select EC2 as the Launch type
5. Setup the Deployment Configureation section
a. Select Service as the Application type
b. Specify the Task Definition you created earlier under the Family section
c. Provide a unique Service Name
d. Choose DAEMON as the Service Type
6. Proceed to create the service
### Container Trace and Log Collection
Begin collecting container trace and log data in your EC2 instance. The Infra Agent will collect ECS container logs emitted to the `stdout` and `stderr` log stream and receive traces from your application and send to your Middleware account.
The Infra Agent must be running as an app before setting up collection. If not, attempted trace collection will throw an error while connecting to the agent and logs will not be sent at all.
#### Modify your Application Task Definition
You can setup container trace and log monitoring by modifying your Task Definition JSON file or following the below steps in the AWS Management Console.
1. To collect traces, configure the `environment` variable in the Task Definition
2. To collect logs, configure the `logConfiguration` variable to enable the `fluentd` logging driver
You do not have to collect container trace and log data at the same time
```json JSON theme={null}
"containerDefinitions": [
{
(...)
"environment": [
{
"name": "MW_AGENT_SERVICE",
"value": "172.17.0.1"
}
],
"logConfiguration": {
"logDriver": "fluentd",
"options": {
"fluentd-address": "172.17.0.1:8006"
}
}
(...)
}
]
```
1. Navigate to the Amazon Elastic Container Service section in the AWS Management Console
2. Click on Task Definition and select your desired Task Definition
3. Create a new revision
Skip steps 4 or 5 if you do not want to enable container traces or logs
4. Enable container traces in your application
a. Under the `Environment Variables` section, select `Add environment variable`
b. Add `MW_AGENT_SERVICE` environment variable and set the value to `172.17.0.1`
5. Enable container logging in your application
a. Navigate to Logging
b. Check `Use logging collection`
c. Add Parameters as seen below
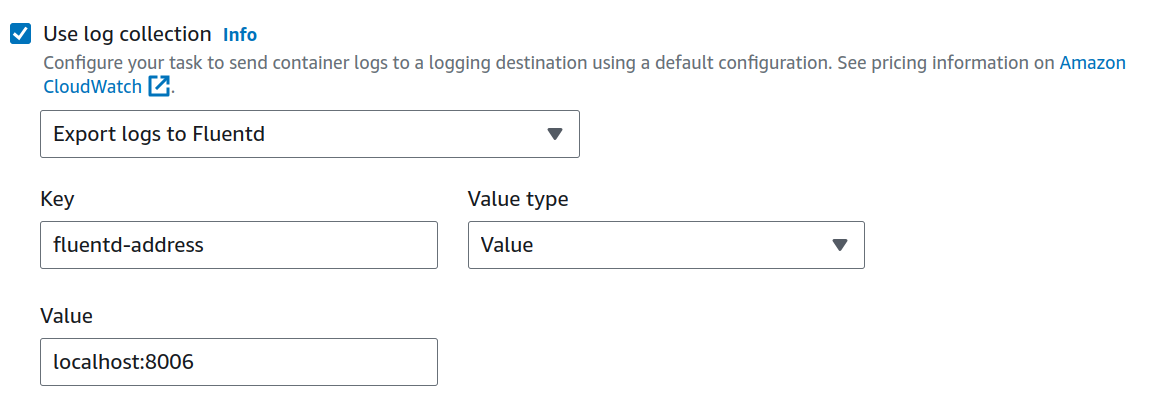
6. Click Create to update your Task Definition
7. Update the Services/Daemon definition to use the latest version of the Task Definition
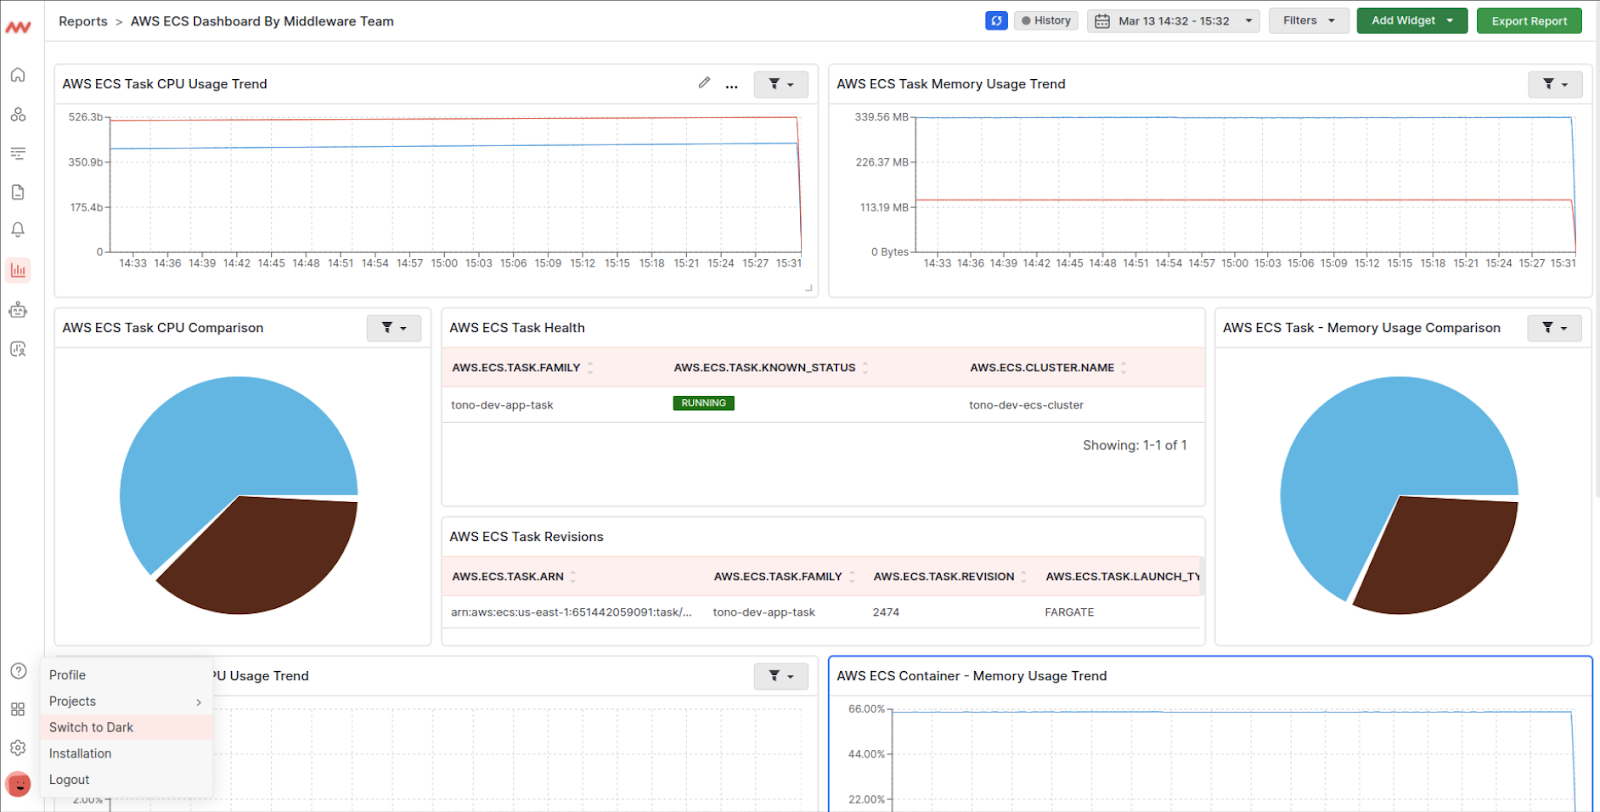
# Visualize Your Data
Quickly access your Amazon ECS data with Middleware’s default ECS dashboard. Navigate to the Dashboard Builder and select the **AWS ECS Dashboard**.
Your AWS ECS data comes from the [awsecscontainermetricsreceiver](https://github.com/open-telemetry/opentelemetry-collector-contrib/tree/main/receiver/awsecscontainermetricsreceiver) whereas your container data comes from the [dockerstatsreceiver](https://github.com/open-telemetry/opentelemetry-collector-contrib/tree/main/receiver/dockerstatsreceiver).
# Troubleshooting
If you do not see the Integrations Menu in Middlware, that means your account has not been granted `Installation` permissions. Contact your system administrator to add the `Installation` permission to your user role in Settings.
Need assistance or want to learn more about Middleware? Contact us at support\[at]middleware.io.